TL;DR

Get furniture and decor delivered free — and shop member deals
- Fast, free delivery on millions of items
- Access to Prime Big Deal Days deals on October 6–7
- Prime Video, Amazon Music and more included
Spooky Halloween wall art helps set the mood for a party or seasonal home display without taking up floor space. Choose one style, build around a focal piece, and use wall-safe mounting and battery-operated lights where appropriate. A few reusable prints or fabric pieces can give you a fresh-looking display year after year.
A crooked portrait and a paper bat can turn a quiet hallway into the part of your home guests remember. Spooky Halloween wall art gives you that instant atmosphere without taking up floor space or crowding the path to the candy bowl.
You can go full haunted manor, keep things cute for little kids, or make a clean, modern display with a few dark silhouettes. The trick is to choose a mood first, then match your art, placement, lighting, and mounting to the room.
Choose one Halloween mood and repeat two or three colors or motifs across the display.
Anchor the arrangement with one focal piece, then add smaller art around it.
Test removable mounting products on an inconspicuous spot and follow their surface instructions.
Keep paper and fabric art away from open flames; use battery-operated lighting nearby.
Store prints flat and framed pieces protected so you can reuse them next season.
Pick a Halloween mood that fits your home
Spooky Halloween wall art works best when its style matches the mood you want: gothic, playful, vintage, minimalist, or handmade. That choice acts like a filter: it helps you decide which pieces belong and keeps the wall from looking like a collection assembled at random. Choose a small set of colors and repeat a few motifs so your display feels planned. A black cat, a crescent moon, and two ravens tell one story more clearly than a jumble of unrelated prints.
For a vintage look, try sepia portraits, ornate thrift-store frames, and a little burgundy. These aged tones suggest an old house without relying on graphic imagery, which can suit shared spaces or guests who prefer a gentler scare. If your household prefers friendly frights, pair smiling pumpkins with cheerful ghosts in orange, cream, and purple. One family might hang a shadowy haunted house in the entry and keep bright pumpkin art near the kids’ bedrooms; using distinct moods in different rooms lets the display suit the people who use each space.
The best palette depends on your room, too. Black and charcoal pop against a pale wall, while cream and muted orange stand out on deep paint. Repeat two or three colors across the art, frame, and nearby decorations, and the wall will feel tied together even if the pieces come from different places. Limiting the palette also gives you room to mix sizes and materials without adding visual noise. If the wall already has strong color or pattern, fewer art colors can keep the display legible.
Build a display around one piece guests notice
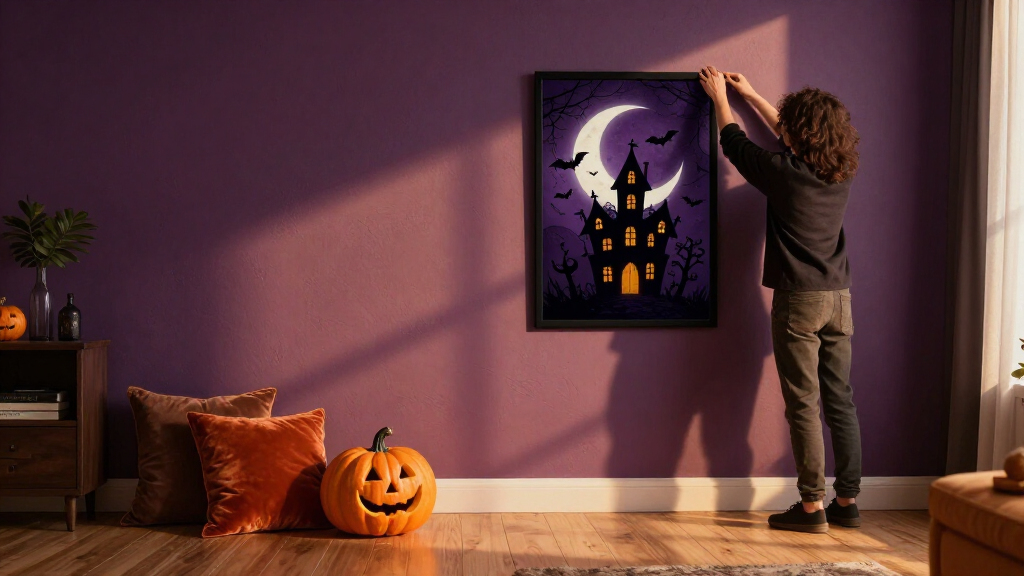
A strong Halloween wall display starts with one focal piece and uses smaller decorations to support it. The focal piece gives the eye a place to land, so the surrounding details feel intentional instead of competing for attention. A large haunted-house print can anchor an entryway; a cluster of postcards, bats, and a narrow banner can carry the same mood down a hallway. Spooky Halloween wall art ranges from eerie prints and vintage-style portraits to decals and homemade silhouettes, so you can choose a format that suits your wall and budget.
Try this simple sequence before you hang anything:
- Pick a focal point: choose one print, portrait, or fabric banner to lead the display.
- Choose supporting pieces: add two or three smaller works that share a color or motif.
- Test the arrangement: lay the pieces on the floor or trace paper templates and tape them to the wall. This makes it easier to spot awkward gaps and check the overall balance before committing to holes or adhesive.
- Check the room: keep art clear of doors, switches, handrails, and busy walkways. A display that blocks everyday access may look good in a photo but quickly becomes frustrating to live with.
For example, place a 16-by-20-inch moonlit house above a console table, then flank it with two smaller raven prints. The large image gives the eye somewhere to land; the small ones make the wall feel layered without adding clutter. Keep the smaller works visually lighter or simpler than the focal image, so they add context instead of splitting attention equally across the wall.
Choose art that suits the wall and your budget
The right Halloween wall art depends on size, surface, and how often you plan to reuse it. Each format trades convenience for durability or flexibility: a framed print lasts for many seasons but weighs more than paper cutouts; removable decals go up quickly but need a wall finish their adhesive can handle. Compare the options before you commit, especially if the wall is textured, freshly painted, or shared with furniture and doorways.
| Art type | Works well for | What to check |
|---|---|---|
| Framed prints | A polished focal point you can reuse | Weight, frame hardware, and secure hanging |
| Paper cutouts | Low-cost clusters and DIY scenes | Keep dry; use suitable removable mounting |
| Fabric banners | Soft texture and easy seasonal storage | Hanging loops and clearance from heat |
| Wall decals | Temporary silhouettes or patterns | Test surface compatibility and follow product directions |
If you’re decorating a rental, lightweight paper shapes or removable decals can help you avoid unnecessary holes, but no adhesive suits every paint or wallpaper. The convenience comes with a surface risk: paint age, wall texture, and adhesive strength can all affect removal. Follow the product instructions and test an inconspicuous spot first. For a low-cost focal piece, print an illustration at home and put it in a thrifted frame; it ranges from simple to surprisingly elegant depending on the frame and paper you choose. A frame costs more effort to hang, but protecting the print makes it easier to reuse and update later.
Make a small wall feel like a haunted scene
You can make a compact wall look atmospheric by using height, spacing, and a few repeated shapes. Vertical movement draws the eye upward and can make a narrow wall feel taller, while repeating one silhouette helps a small number of pieces read as a scene. A vertical line of bats can lead your eye toward a framed portrait, while a short banner fills the gap above a doorway. This approach gives your seasonal home display presence without taking up furniture or floor space.
Imagine a narrow apartment entry: hang a small, pale portrait at eye level, place three black paper bats rising toward the ceiling, and add a deep-purple ribbon below. The bats seem to flutter through the space, and the portrait becomes the quiet center of the scene. Leave the light switch and door swing clear so the decoration stays fun instead of getting in the way. In a tight entry, that clearance matters as much as the composition: people pass through with bags and coats, so pieces that snag or obscure controls are more likely to be bumped or removed.
For a larger living room, spread the pieces wider and leave breathing room around each frame. A gallery wall doesn’t need to cover every inch. Open wall space is part of the design, especially when dark artwork already draws the eye. Spacing gives each image room to register, and it keeps a seasonal display from making a busy room feel smaller.
Use light to bring out the eerie details safely
Lighting changes how Halloween wall art reads: warm, dim light softens vintage prints, while a gentle side light makes paper silhouettes cast crisp shadows. The light’s direction and color can change the mood as much as the artwork itself: warm light makes a scene feel aged and welcoming, while cooler light can make edges feel sharper and more theatrical. A small battery-operated light near a haunted-house print can make its windows glow without placing a flame beside decorations. Keep cords and fixtures out of doorways and other walking routes.
Consider a living-room wall with a black-and-cream portrait. A warm lamp across the room can pull the yellowed tones forward; a cool light aimed at bat cutouts can make their edges look sharper. Try the lighting after dark, when you can see whether glare hides the art or shadows land where you want them. A strong direct beam may create dramatic shadows, but it can also wash out a print or make the wall feel harsh, so adjust the angle or brightness until both the art and its surroundings remain visible.
Keep open flames away from paper and fabric decorations. Use battery-operated lights near the display, and follow the light maker’s instructions.
More light isn’t always more spooky. One focused glow and the soft flicker of shadows often feel more atmospheric than a row of bright bulbs. Let the artwork do the talking, and use light to reveal its texture. A restrained setup also makes it easier to keep the room comfortable for everyday use after the initial surprise wears off.
Make a DIY piece you’ll want to hang again
A simple DIY Halloween artwork can cost very little and still look considered when you repeat a color and keep the shapes clean. A limited design is easier to read from across a room, and it is less likely to feel dated when you reuse it. Cut a crooked church or row of bare trees from black paper, then layer it over cream cardstock for a moonlit scene. A repurposed frame gives the paper a finished edge and helps protect it between seasons.
For a quick project, choose a printable design, place it in a frame you already own, and add one handmade detail such as a paper raven perched along the bottom. If children are helping, have an adult handle sharp scissors or craft knives and pick materials suited to their age. You can also draw a friendly ghost on cardstock and let kids add orange cheeks or tiny star stickers. Choosing a frame or backing you already have keeps the project inexpensive; adding more specialty materials may improve the finish, but can make a one-evening craft less practical to repeat.
DIY doesn’t have to mean complicated. One strong silhouette can carry more mood than a crowded collage, and a handmade piece often becomes a family favorite that returns each October. Keeping the design simple also makes repairs easier: if an edge bends or a small detail comes loose, you can refresh it without rebuilding the whole piece.
Store your art so next October’s setup is easy
Halloween wall art stays in better shape when you store it dry, flat, and protected from scratches. Moisture can warp paper and fabric, while rubbing can scuff printed surfaces, so a little separation now saves you from replacing damaged pieces later. Put paper prints in a sleeve or between clean sheets of cardboard, wrap framed pieces, and fold fabric banners loosely rather than crushing them into a tight ball. A labeled box saves you from hunting through decorations next year.
For instance, keep decals on their original backing and place small paper bats in a labeled envelope. Store the envelope with the matching display notes or a quick phone photo of the layout. That small record is useful if the arrangement depends on specific spacing or a particular wall; without it, reusable pieces can still take time to reassemble. When October comes around, you can rebuild the wall in minutes instead of trying to remember where every piece went.
There’s no fixed date for putting decorations up or taking them down. Many households make the switch in October and pack things away after Halloween; choose the timing that fits your routine and local custom. Reusable pieces make the annual changeover easier and cut down on single-season clutter. A simple storage system also makes it easier to edit the display next year: you can see what you own before buying more and replace only the pieces that no longer suit the room.
Frequently Asked Questions
What should I put on a wall for Halloween?
Start with a focal piece, such as a haunted-house print, vintage portrait, or fabric banner. Add smaller art or silhouettes that share its colors or subject, and keep doors, switches, and walkways clear.
How can I hang Halloween art without damaging the wall?
Use lightweight art and mounting products suited to your wall surface. Follow the maker’s directions and test an inconspicuous spot first, since paint and wallpaper can react differently to adhesives.
What colors make Halloween wall art look spooky?
Black, charcoal, and deep purple create a classic eerie look. Orange feels traditional, while muted cream, burgundy, and sepia work well for a vintage display.
Is Halloween wall art safe near candles?
Paper and fabric decorations can catch fire, so keep them well away from open flames. Battery-operated lights are a safer choice near a wall display; follow the light maker’s instructions.
How do I store Halloween wall decorations?
Keep paper art flat and dry, protect framed pieces from scratches, and store fabric loosely folded. Label the box and keep decals on their backing so next year’s setup goes smoothly.
Conclusion
Start with one piece you love, then build a small scene around it with a repeated color, a little texture, and safe light. A thoughtful wall can make an ordinary room feel haunted—and next October, that familiar portrait will be waiting in its labeled box to return.
Evergreen bestsellers Picks
bestsellers
As an affiliate, we earn on qualifying purchases.