To create your DIY gift wrap station at home, choose a spacious, well-lit area near storage to easily swap out supplies. Gather essential items like wrapping paper, ribbons, scissors, and tape, and organize them using containers, wall-mounted racks, or labeled drawers. Design a layout that keeps frequently used supplies within reach and maximizes space with vertical storage solutions. Keep your station tidy and updated for each season. Keep exploring to discover more tips for a perfect wrapping space!
Key Takeaways
- Select a spacious, well-lit area near storage for easy access and seasonal adjustments.
- Use custom shelving, labeled containers, and vertical storage to maximize space and organization.
- Design clear zones for wrapping supplies, scissors, tape, and ribbons for efficient workflow.
- Incorporate seasonal themes and regularly update labels to keep materials current and clutter-free.
- Opt for portable, durable containers and carts to create a flexible wrapping station that moves easily.
Choosing the Perfect Location for Your Wrapping Station

Finding the right spot for your wrapping station is essential to stay organized and make the wrapping process smooth. Choose a location with ample space to spread out decorations, wrapping paper, and supplies. Consider a well-lit area to easily see details when matching decorating themes or seasonal adjustments, like holiday or birthday motifs. An accessible spot near your storage or closet makes it easier to rotate items based on the season or occasion. If possible, select a space that’s easy to clean and won’t interfere with daily activities. This way, you can quickly switch from wrapping to decorating, keeping everything neat and efficient. A dedicated, versatile area ensures your gift wrapping remains stress-free, regardless of the occasion or decorating themes you’re working with. Incorporating well-designed storage solutions can further enhance organization and ease of access.
Gathering Essential Supplies and Organizing Tools
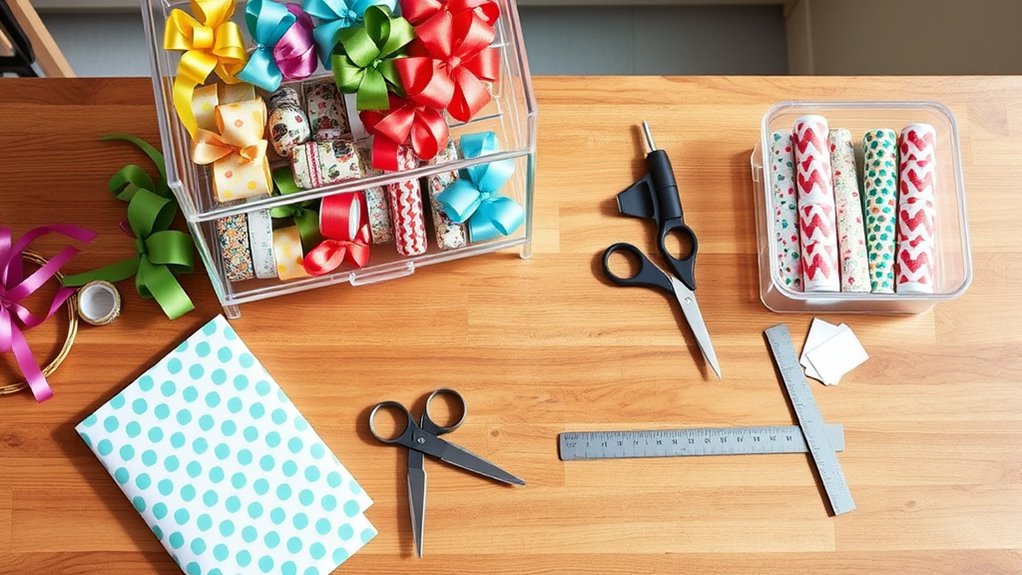
With your wrapping station set up, the next step is to gather all the supplies and tools you’ll need to work efficiently. Start by collecting essential gift wrap supplies such as scissors, tape, ribbons, bows, and tags. Use storage containers to keep everything organized and easily accessible. To maximize space, choose containers with compartments for different items. Here’s a quick overview:
| Supplies | Organization Tips |
|---|---|
| Gift wrap rolls | Store vertically to save space |
| Tape and dispensers | Keep in small, labeled containers |
| Ribbons and bows | Use divided trays for easy access |
| Tags and labels | Store in small drawers or boxes |
| Scissors | Keep in a designated holder |
This setup ensures your supplies stay tidy, visible, and ready for your next wrapping session. Additionally, maintaining an organized storage system can help reduce stress and improve your overall gift wrapping experience.
Designing an Efficient Layout for Easy Access

Creating an efficient layout for your wrapping station guarantees everything you need is within easy reach, saving you time and effort. Use custom shelving to maximize vertical space and keep supplies organized by type, so you can find what you need instantly. An ergonomic design ensures comfort during wrapping sessions—position your work surface at a suitable height and keep tools within arm’s reach. Place frequently used items, like tape and scissors, nearby to avoid unnecessary movement. Clear pathways and designated zones help streamline your workflow, reducing clutter and frustration. Incorporate adjustable shelves or storage units to adapt as your collection grows. With thoughtful planning, your DIY wrapping station becomes both functional and comfortable, making gift wrapping a more enjoyable, efficient task. Creating a calm, organized space promotes a smoother, more enjoyable wrapping experience every time.
Utilizing Storage Solutions for Wrapping Paper and Ribbons
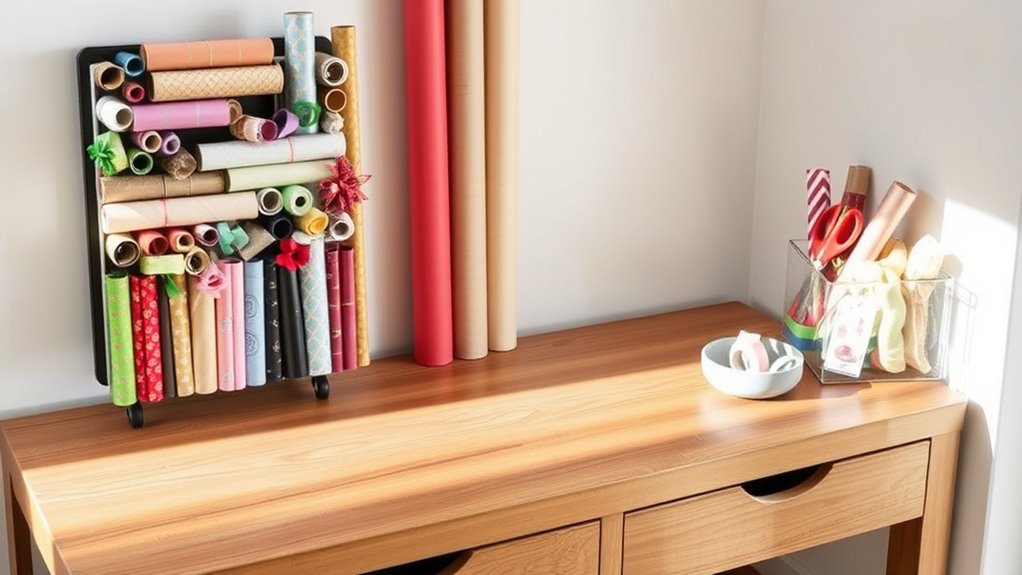
To keep your wrapping paper and ribbons organized and easily accessible, investing in smart storage solutions is essential. Storage bins are perfect for stacking and protecting your wrapping paper rolls, preventing tears and creases. Choose clear bins so you can quickly identify the patterns and colors you need. For ribbons, ribbon racks offer a convenient way to keep them tangle-free and visible. Hang racks on the wall or inside a closet door to save space while maintaining easy access. Use dividers within bins to separate different types or sizes of wrapping paper. Label each container for quick identification. Incorporating energy-efficient storage options can also help reduce your environmental footprint while organizing your supplies. These simple solutions help you stay organized, saving time when wrapping gifts and ensuring your materials stay neat and ready to use whenever inspiration strikes.
Creative Ways to Store and Display Gift Wrap Materials

Finding innovative ways to store and display your gift wrap materials can make the wrapping process more enjoyable and efficient. Consider these creative options:
- Use a tiered hanging organizer to showcase various gift wrap styles, making it easy to select the right one quickly.
- Install wall-mounted rods or hooks for seasonal themes, allowing you to hang rolls vertically without clutter.
- Repurpose a decorative ladder as a display for different gift wrap patterns, adding a visual flair.
- Store smaller accessories like bows and ribbons in clear bins or labeled drawers for quick access.
- Incorporate Free Floating elements like small potted plants or decorative accents into your wrapping station to create a more inviting and personalized space.
These ideas keep your gift wrap materials organized and visually appealing, inspiring you to mix and match seasonal themes and styles effortlessly.
Incorporating Personal Touches and Decorative Elements

Adding personal touches to your gift wrap makes each present feel special. You can customize gift tags with names or heartfelt messages and use festive accents to match the occasion. These small details turn simple wrapping into a memorable presentation. Incorporating creative storytelling into your gift presentation can also reinforce your personal or brand message, making the experience even more meaningful.
Personalized Gift Tags
Personalized gift tags instantly add a special touch to your wrapped presents, making them feel more thoughtful and unique. Custom gift tags allow you to showcase your creativity and add a personal message that resonates. Here are some ideas to elevate your gift tags: 1. Use high-quality cardstock to create durable, eye-catching tags. 2. Add hand-drawn illustrations or calligraphy for a personalized flair. 3. Incorporate ribbons, stickers, or decorative elements to enhance visual appeal. 4. Write heartfelt messages or include the recipient’s name for a meaningful touch. Incorporating analytics cookies can also help you understand which designs resonate most with your recipients, allowing you to refine your gift tag creations for future occasions.
Festive Decorative Accents
Elevate your gift wrapping by incorporating festive decorative accents that reflect your personal style. An ornament display adds charm and a personalized touch, making each gift unique. Use holiday-themed accents like ribbons, bows, and small trinkets to enhance your wrapping. Incorporate ornaments that complement the recipient’s taste or the occasion, creating a memorable presentation. You can also add sprigs of holly, pinecones, or glittery elements for extra sparkle. These decorative touches not only make your gifts stand out but also show your effort and creativity. Keep your ornament display organized in a dedicated section of your wrapping station for quick access. Additionally, incorporating wrapping techniques can elevate the overall presentation and make your gift wrapping more polished. Combining personal touches with holiday accents makes your gift wrapping more festive, thoughtful, and visually appealing.
Maintaining and Refreshing Your Wrapping Station

To keep your wrapping station organized and efficient, regular maintenance is essential. Rejuvenating your setup ensures it stays functional and inspiring. Focus on these four key steps:
- Rotate gift wrap themes to match upcoming occasions, keeping seasonal color schemes in mind.
- Check stock levels for tape, ribbons, and tags, and replenish as needed.
- Clear out expired or damaged materials to prevent clutter.
- Update decorative accents and labels to reflect current gift wrap themes.
- Incorporate storage organization strategies to optimize space and accessibility within your station.
Tips for Making Your DIY Wrapping Station Portable

Once your wrapping station is well-organized and stocked, making it portable allows you to create gifts anywhere in your home or even outdoors. To achieve a portable setup, focus on using lightweight materials that are easy to carry. Choose a sturdy plastic bin or a rolling cart with wheels to hold your supplies, so you can move it effortlessly. Opt for compact, collapsible storage containers for your ribbons, bows, and tape, reducing bulk and weight. Use a tote bag or a lightweight caddy to organize scissors, pens, and small embellishments. Keep everything within reach and easy to transport. Additionally, selecting materials with good durability ensures your portable station can withstand frequent movement without damage. With these tips, your wrapping station becomes flexible, making gift wrapping a convenient task, whether you’re in the craft room, living room, or backyard.
Frequently Asked Questions
How Can I Customize My Wrapping Station to Fit Small Spaces?
To customize your wrapping station for small spaces, opt for compact storage solutions like stacking bins or hanging organizers that save space. Incorporate multi-functional furniture, such as a rolling cart that serves as both a workspace and storage area. You can also use wall-mounted shelves to keep supplies within reach without cluttering your area. This way, your station remains efficient and organized, even in limited space.
What Eco-Friendly Materials Are Best for a Sustainable Wrapping Station?
Imagine a wrapping station filled with sunlight and eco-friendly choices. You should opt for recyclable materials like paper and tissue, which easily break down after use. Biodegradable options, such as plant-based wraps or compostable ribbons, add a sustainable touch. These materials not only reduce waste but also help you create a greener, more mindful wrapping space, turning your gift-giving into an environmentally conscious act.
How Do I Prevent My Wrapping Supplies From Getting Damaged or Dusty?
To keep your wrapping supplies protected from damage and dust, invest in sturdy storage solutions like clear plastic bins or stackable drawers. Make sure to seal lids tightly and place your supplies in a cool, dry area. Use dust covers or cloths for extra protection, especially if you store them in less controlled spaces. Regularly check and clean your storage to prevent dust buildup and keep your supplies in top condition.
What Are Creative Ways to Label and Organize Different Wrapping Supplies?
To keep things tidy, use creative labeling with colorful tags, chalkboard labels, or printable stickers for your storage solutions. You might also repurpose jars, bins, or file folders, labeling each clearly. Visual cues like icons or pictures help quickly identify supplies. This way, you’ll easily find what you need, stay organized, and add a fun touch to your wrapping station, making gift wrapping more enjoyable and efficient.
How Can I Incorporate Technology Into My DIY Wrapping Station?
You can incorporate technology into your DIY wrapping station by using digital tools like a barcode scanner app to track supplies or a planner app to schedule wrapping days. Opt for smart storage solutions with USB charging ports or LED lights for better visibility. Incorporate a tablet or small screen to access gift wrap ideas, tutorials, or inventory lists. These smart storage options keep your station organized and tech-savvy, making wrapping more efficient.
Conclusion
With your DIY wrapping station beautifully organized, you’ll feel inspired every time you step into your space. Imagine ribbons cascading like waterfalls, wrapping paper rolls standing tall like colorful trees, and a cozy corner ready for your creative touch. This haven becomes your go-to spot, turning gift wrapping into a joyful, effortless experience. Keep it fresh and inviting, and watch your gift-giving moments become even more special. Your perfect wrapping sanctuary awaits!