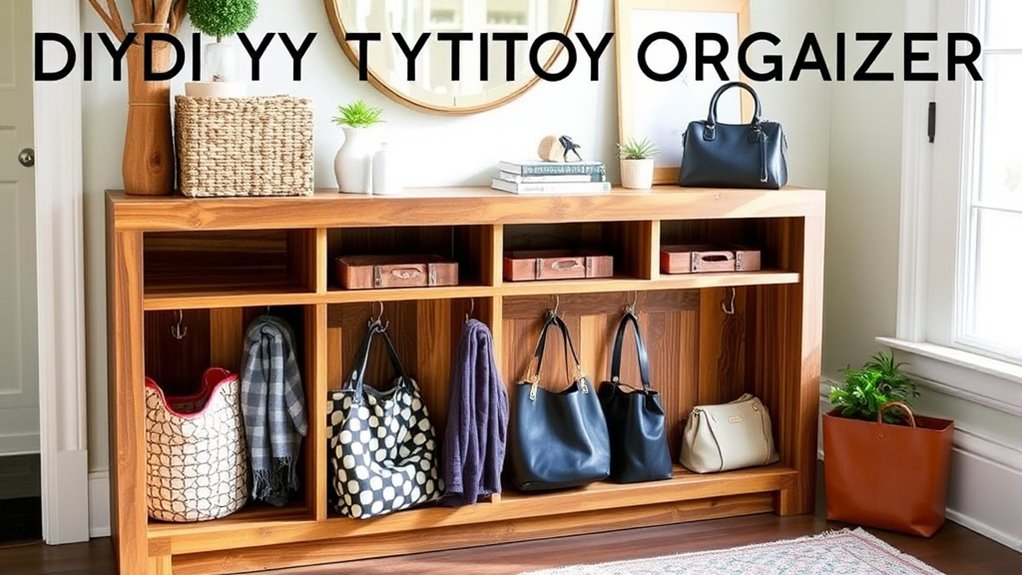
To create a stylish DIY entryway organizer, start by evaluating your space and needs, then gather the right materials like wood or recycled items and essential tools. Design a functional layout with hooks, shelves, and compartments tailored to your habits. Add personal touches with paint and decor to make it inviting. Installing these features efficiently and maintaining your setup will keep your drop zone tidy. Keep going to discover more tips to perfect your organizer.
Key Takeaways
- Assess your space and needs to plan an organized, functional entryway that fits your style and traffic flow.
- Choose durable, matching materials like wood or MDF, and gather necessary tools for DIY assembly.
- Incorporate wall hooks, shelves, and compartments to maximize storage for shoes, keys, and accessories.
- Personalize your organizer with paint, decorative accents, and seasonal decor for a stylish, welcoming drop zone.
- Regularly maintain and update your organizer to keep it tidy, functional, and aligned with your evolving style.

Optish Coat Rack Wall Mount, 16.5 Inches Wood Coat Hooks, Wall Hooks for Hanging, Hat Rack Bag Hanger Key Holder for Wall, Purse Hanger Towel Racks for Bathroom (1Pack, Brown)
Dimensions: The dimensions of our product are 16.5 x 2 inches, the length of the hook is 3.2…
As an affiliate, we earn on qualifying purchases.
As an affiliate, we earn on qualifying purchases.
Assessing Your Entryway Needs and Space

Before you start building your entryway organizer, it is vital to evaluate your space and determine what you need. Observe the daily entryway traffic to understand peak times and how many people use the space. Consider your footwear habits—do everyone in your household tend to leave multiple pairs, or do they only bring in a few? This will influence whether you need a large shoe rack or a simple tray. Measure the available area carefully, noting any obstructions like doors or outlets, so your organizer fits comfortably. Think about additional storage needs, such as hooks for bags or space for keys. By assessing these factors, you’ll create a functional, tailored solution that keeps your entryway tidy and accommodates your household’s habits. Recognizing the importance of a family photoshoot fails can help you design an organized space that minimizes clutter and unexpected distractions.

Pipishell Bamboo Shoe Rack Bench, 3 Tier Sturdy Shoe Bench, Storage Shoe Organizer, Holds up to 300lbs for Entryway Bedroom Living Room Balcony, Brown
Organize Your Entryway: The shoe rack for entryway is a great solution for every home. Tidy up your…
As an affiliate, we earn on qualifying purchases.
As an affiliate, we earn on qualifying purchases.
Gathering Materials and Tools for Your Project

To start building your entryway organizer, gather all the necessary materials and tools upfront to keep the project moving smoothly. Begin with hardware essentials like screws, nails, hooks, and brackets to guarantee your organizer is sturdy and functional. Consider material options such as wood, MDF, or plywood, depending on your desired look and durability. For tools, you’ll need a drill, screwdriver, measuring tape, level, and saw. Having everything ready prevents interruptions and helps you work efficiently. Double-check your list to avoid missing key items that could delay progress. Choose quality hardware and reliable tools to make assembly easier and ensure your organizer lasts. Being well-prepared sets a solid foundation for a successful DIY project. Additionally, understanding AI applications in learning and entertainment can inspire innovative features or materials for your organizer.

AUTOHJ Folding Shelf Brackets – 24 Inch 2 Pcs Heavy Duty Metal Collapsible Triangle Shelf Bracket, DIY Wall Mounted Shelf Bracket, Space Saving for Bench Table
【MULTI-PURPOSE APPLICATION】: The wall shelf brackets could be mounted on the wall to work as shelfs with board…
As an affiliate, we earn on qualifying purchases.
As an affiliate, we earn on qualifying purchases.
Designing a Functional and Stylish Layout

To create an entryway that’s both practical and appealing, focus on maximizing storage space without clutter. Choose a cohesive style that ties everything together and enhances your home’s overall look. By balancing function and design, you’ll craft an organizer that’s as beautiful as it is useful. Incorporating smart design principles can further optimize your space for comfort and style.
Maximize Storage Space
Maximizing storage space in your entryway involves thoughtful planning to guarantee every inch serves a purpose. Start by utilizing vertical space with shelves or hooks, which keep essentials like keys and bags within reach. Incorporate weatherproofing strategies to protect outdoor gear from moisture, ensuring longevity. Good entryway lighting enhances visibility, making it easier to find items quickly. To inspire you, here’s a layout idea:
| Storage Type | Features | Benefits |
|---|---|---|
| Wall Hooks & Pegs | Hang coats, umbrellas | Save floor space, quick access |
| Shelving Units | Store shoes, baskets | Maximize vertical storage |
| Bench with Storage | Hidden compartments | Keep shoes and accessories tidy |
This setup boosts efficiency while keeping your space stylish and functional. Additionally, considering spatial organization can help you optimize every corner to improve overall flow and usability.
Choose Cohesive Style
Creating a cohesive style for your entryway guarantees that functionality and aesthetics work seamlessly together. To achieve this, focus on matching color schemes throughout your space, ensuring everything from storage bins to decorative accents complements each other. Select a palette that reflects your personality and keeps the area feeling inviting. Coordinating decorative elements, such as wall art, hooks, and rugs, help unify the look, making your drop zone feel intentional and stylish. This approach not only creates visual harmony but also makes your entryway more inviting and easier to organize. Incorporating sustainable design principles can further enhance your space by emphasizing eco-friendly materials and energy-efficient solutions. Cohesiveness transforms your space into a polished and functional entry point.

Craftmastudio Rustic wall mail organizer,Key and Mail File Holder for Wall Mount,with 6 Key Hooks 2 Double Key Hooks A blackboard,for Home,Office, Classroom,Entryway Decor (brown)
5-Tier Wall-Mounted File Holder:Hanging file organizer with 4 separate card slots for categorizing mail, letters, bills, documents, magazines,…
As an affiliate, we earn on qualifying purchases.
As an affiliate, we earn on qualifying purchases.
Building a Custom Wall-Mounted Key and Mail Organizer

Building a custom wall-mounted key and mail organizer is a practical way to keep your entryway tidy and organized. It offers a dedicated spot for your keys, mail, and small essentials, reducing clutter and stress. When designing your organizer, think about incorporating entryway lighting to highlight the area and make it easier to find what you need. Adding seasonal decor, like small hooks for holiday ornaments or themed accents, keeps your space fresh and inviting year-round. Remember, a well-placed organizer not only improves functionality but also enhances your entryway’s style. Use different compartments to separate keys from mail, and customize the layout to suit your needs. This project creates a functional focal point that combines practicality with your home’s aesthetic. Additionally, understanding drone safety can inspire innovative storage solutions or creative decor ideas for your entryway.
Creating a DIY Shoe Rack With Recycled Materials

Transforming recycled materials into a functional shoe rack is an eco-friendly and budget-savvy way to organize your entryway. Use sturdy cardboard boxes, old wooden pallets, or crates to create shoe storage that’s both practical and sustainable. For example, stack cardboard boxes and secure them with tape or glue to form compartments for shoes. Alternatively, repurpose an unused wooden pallet by sanding it down and adding dividers for a rustic look. Recycling ideas like old crates can be stacked or mounted to save space. This approach not only reduces waste but also adds a unique, personalized touch to your entryway. Incorporating contrast ratio considerations can help you choose the right materials and lighting to enhance visibility of your DIY rack. With a little creativity, you’ll have a stylish shoe rack that’s environmentally friendly and tailored to your space.
Crafting a Multi-Purpose Drop Zone Tray

After assembling your eco-friendly shoe rack, the next step is to design a versatile drop zone tray to keep daily essentials organized and within reach. This multi-purpose storage piece acts as a central hub for keys, mail, sunglasses, and small accessories, making your entryway more functional. To maximize its effectiveness, choose a tray with compartments or sections tailored to your needs. You can also add small bowls for loose change or jewelry. Remember, a well-crafted drop zone tray enhances entryway organization by reducing clutter and streamlining daily routines. Incorporating a support breakfast themed item, such as a small basket for fruit or snacks, can add a touch of warmth and hospitality to your entryway. It’s a simple yet impactful upgrade that keeps everything you need close at hand, helping you start and end each day with a neat, welcoming space.
Adding Personal Touches With Paint and Decor

Choosing your favorite colors for the organizer can make it uniquely yours, so consider shades that match your style or mood. You can also add decorative accents like knobs, stickers, or stencils to give it extra personality. Personal touches like these turn a simple organizer into a reflection of your space and taste. Incorporating Free Floating elements into your design can enhance the overall aesthetic and functionality.
Custom Color Choices
Adding personal touches with paint and decor allows you to make your entryway organizer uniquely yours. Choosing the right color palette and finish options lets you reflect your style while ensuring durability. Bright colors can energize your space, while softer shades create a calming atmosphere. Consider how different finishes—matte, gloss, or satin—impact the look and feel. Matte finishes hide imperfections, gloss adds shine, and satin provides a subtle sheen. To deepen your understanding, keep these points in mind:
- A bold color palette can make a statement and set the tone for your home.
- Selecting the right finish enhances longevity and maintains appearance.
- Personalized color choices create a welcoming, cohesive drop zone.
These choices turn a simple organizer into a reflection of your personality.
Incorporate Decorative Accents
Ever wondered how to truly make your entryway organizer stand out? Adding decorative accents is the secret. Use seasonal accents like small pumpkins for fall or wreaths for winter to keep your space fresh and inviting. Incorporate decorative lighting such as string lights or a stylish lamp to create warmth and ambiance. Personal touches like painted initials or colorful hooks also make a big difference. Here’s a quick guide:
| Accent Type | Tips |
|---|---|
| Seasonal Accents | Swap out decorations with the seasons for freshness |
| Decorative Lighting | Use soft, warm lights to add cozy ambiance |
| Paint Details | Add a pop of color with painted designs or patterns |
| Personal Items | Hang family photos or favorite artwork |
| Unique Decor | Incorporate vintage or quirky pieces to reflect your style |
Adding accessory placement considerations can further enhance the overall look. These accents bring personality and charm, transforming your drop zone into a welcoming space.
Installing Hooks and Compartments for Accessories

Typically, installing hooks and compartments for accessories is a straightforward step that instantly boosts your entryway’s organization. Using magnetic hooks makes it easy to hang keys, bags, or umbrellas without damaging walls. Decorative compartments help keep small items like sunglasses, mail, or gloves tidy and accessible. When placing hooks, consider high-traffic spots for everyday essentials and lower areas for seasonal accessories. Decorative compartments can be mounted on walls or placed on shelves to add style and function. This simple setup minimizes clutter and saves time when you’re heading out or coming home. Remember, strategic placement makes a difference—opt for a mix of hooks and compartments that suit your daily routines and aesthetic preferences.
Maintaining and Updating Your Entryway Organizer
How often do you check and refresh your entryway organizer to keep it functioning smoothly? Regular maintenance guarantees everything stays tidy and practical. Incorporate seasonal decor updates to keep the space fresh and inviting. Swap out outdated or worn items, like old hooks or containers, for newer, more efficient options. Establish cleaning routines—wipe down surfaces, clear out clutter, and tidy compartments weekly or biweekly. This prevents buildup of dust and dirt and keeps your organizer looking its best. Adjust storage as seasons change; for example, add a tray for gloves and scarves in winter or a tray for sunglasses and sun hats in summer. Staying consistent with these updates helps your entryway stay functional, stylish, and welcoming all year round.
Frequently Asked Questions
What Are the Best Materials for a Durable DIY Entryway Organizer?
For a durable DIY entryway organizer, consider material options like solid wood, metal, or high-quality plastic, as they offer excellent durability factors. Solid wood is sturdy and ages well, while metal provides strength and a modern look. Plastic is lightweight yet resistant to moisture. Your choice depends on your style and how much wear and tear the organizer will endure, ensuring it stays functional and attractive over time.
How Can I Maximize Small Entryway Space Effectively?
Maximize your small entryway by choosing smart storage solutions, stacking vertical space, and using multi-functional furniture. Incorporate decorative accents to add personality without clutter, and keep essentials within reach with wall-mounted hooks and slim shelves. Prioritize organization over excess, creating a clean look that feels spacious. Use mirrors to reflect light and open up the area, and regularly declutter to maintain both style and functionality in your compact entryway.
What Safety Precautions Should I Consider During Construction?
When building your entryway organizer, prioritize safety by childproofing tips like securing heavy furniture to walls and using safety locks on drawers. Check electrical safety by inspecting outlets for proper ground wiring, covering unused outlets with safety caps, and avoiding overloaded circuits. Always keep sharp tools out of children’s reach, wear protective gear, and work in a well-lit area. Taking these precautions guarantees a safe, functional space for your family.
How Do I Prevent My Organizer From Damaging Walls or Floors?
Sure, you want your organizer to stay put without turning your walls and floors into battle scars. Use wall protection like adhesive bumpers or spacer pads to prevent scratches. For floor safeguarding, add rubber feet or a non-slip mat underneath. These simple tricks keep your space pristine while ensuring your stylish organizer stays in place, not causing damage or chaos. After all, beauty shouldn’t come at the expense of your walls!
Are There Eco-Friendly or Sustainable Options for DIY Organizers?
Yes, you can choose eco-friendly options for your DIY organizer. Use recyclable materials like reclaimed wood, bamboo, or recycled plastic to build it. Opt for eco-friendly finishes such as natural oils, beeswax, or low-VOC paints to reduce environmental impact. These choices help you create a stylish, sustainable drop zone that’s kind to the planet while keeping your entryway organized and eco-conscious.
Conclusion
With your new entryway organizer, you’ve transformed your space into a modern-day Midas touch—turning clutter into gold. As you regularly update and personalize your setup, remember that even Athena’s wisdom was about adaptability. Keep your drop zone as inviting and functional as a cozy agora, and enjoy the satisfaction of a tidy, stylish space that welcomes you home every day. Your effort proves that a little DIY magic goes a long way.